Categories
High School Technology

Animations Using Parametric Curves

This past semester I added a fresh coat of paint to a unit on parametric equations by challenging students to develop their own animations on Desmos. For many years I have used a Desmos activity to introduce the idea of time as a parameter within equations – https://teacher.desmos.com/activitybuilder/custom/576ed1058e03e695283c88b8 – and Desmos invites students to think about the role of time by inserting the idea into ordered pairs easily. Here’s how I introduced the idea. If you get lost or want to look under the hood, here is the final Desmos graph I share with students as a resource: https://www.desmos.com/calculator/7zuubmunhl

STEP 1: Develop Your Vision

Before we dive into Desmos, think about what you want to animate and the path you want it to take. For this demo I have a vision of a ball starting in quadrant 3 and following 3 linear paths until the end in quadrant 1. Sketching out the vision is helpful:

The animation here has 3 linear phases – see the points below, and you can certainly allow for non-linear paths as well. There are a few things for students to attend to here: how the coefficients of t allow for movement, and notice how (t-7) and (t-10) are used in the second and third points in order to “trigger” the animations at the right time, matching the domain of t given for each of the points. Take time to build this with students. Define the second point to begin when the path of the first ends, then include the parameter t.

Allow students to interact with the points and alter them to their liking. Or have students develop their own paths.

STEP 2: Introduce an Image

Next, find an image you would like to animate. I used a soccer ball here, and added a cute sun in the sky later. Upload the image to Desmos, and drag the corners to adjust the size of the image.

Now, a little heavy lifting with Desmos. Students will need to attend to precision and symbols here – encourage students to work together to follow the steps and syntax.

The goal is to replace the center of the image with a conditional statement using the 3 paths we defined earlier. The center I used with my soccer ball is shown below, and note the structure: for each path, start by stating a period for t, followed by the parametric point, separated by a colon. Then, a comma will separate each of the 3 stages.

It’s helpful to share the graph with students so they can dissect the command and make sure the syntax they are using is working.

Defining the center in this manner will then invite us to create a slider for t, which we will do here. Click the endpoints of the slider to define the start and end of the time period you would like. Then play and let the oohs and aahs wash over the room.

STEP 3: Explore the Space

Now it’s time for students to build their own creations. As students build, they may become inspired to investigate new ideas. In my class, some things which came up are:

  • Non-linear paths: these can be defined within the points
  • Rotations: t can be used to define the angle of an image
  • Image dilations and appearances: the slider for t can also be used to define the height and width of an image, as well as the opactity
  • Backgrounds: students can find a general image to serve as a background. I encouraged students to lower the opactity of and background image so that the animation pops on the screen.

STEP 4: Gallery Walks

Allow students to share their creations with each other half-way through the project and ask questions about procedures. In tech-based lessons, students are often their best resource, and inspiration for a new idea can come from each other. Here are a few student creations from this first project attempt.

Advertisement
Categories
High School

EdCamp and My Amazing Principals

alg-ad-snickers-betty-white-jpg
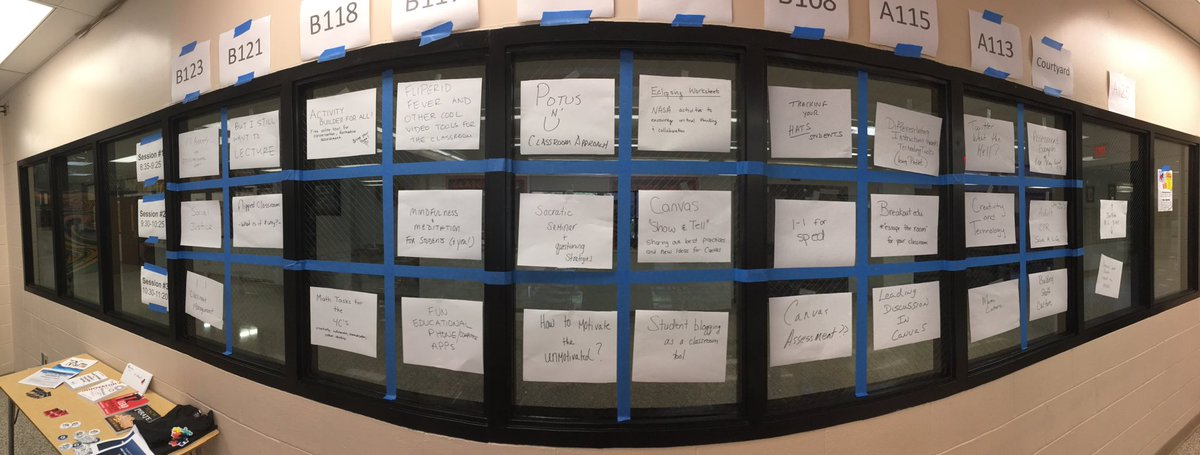
The first week of district PD – lots of meetings, scads of “sit and get” messages, and every administrator making sure their voice is heard.  I suspect what I am describing is not unique to my area. A great opportunity to energize is lost, and the “grind” begins. And I haven’t been too shy about expressing my displeasure through tweets when I am frustrated – I can be kind of a jerk (think of those Snickers ads…better?…better…).

This week my school admin team got it right. And I feel fortunate to work with them. 

For about a year, my school’s admin team had kicked around the concept of a school-wide EdCamp. To be honest, I never thought it would see the light of day…there are just too many other things loaded into the calendar.  So an invitation to work with a team of teachers to organize a high school-wide EdCamp was a true surprise…then the work began.

We planned 3 morning sessions, followed by lunch and prizes.  But beyond the structure of the day, we had a lot of talking-up to do.  Would our teachers, many of whom had never been to an EdCamp, understand the concept?  Would people propose sessions? Could we engage the curmudgeons in our teaching ranks? At our opening faculty meeting, we showed a brief video to help teachers understand the EdCamp concept, then talked it up over the next 2 days.

building

The morning of the conference many teachers suggested ideas, asked questions and thought about what they’s like to learn. In the end, we had a nice variety of topics and it felt like there was something for everyone!

grid

As I walked around during the sessions, I was thrilled to see rooms filled with discussions, and teachers from different departments with an opportunity to engage.  I know there is no possible way every to reach everyone, but I hope it was a day of professional learning for most.

On my end, I offered a session “Activity Builder for the Non-Math Crowd” which seemed to be of use to those assembled. Then later, a session where we just did math – problems from Open Middle, Nrich, Visual Patterns and others let math teacher talk, learn, and think about engaging problems for their classrooms. You can download the problems I shared with this link.

Thanks to the fantastic people I work with for letting me be part of this: Baker, Dennis, Kristina and Melissa.

And a big thanks to the HH admin team: Dennis, Ralph, Tracey and JZ.  I appreciate the opportunity, and promise not to complain again….until the next time…..


Categories
Algebra High School

Last Week I Refused to Teach Factoring

The students in my Freshman Honors class have certain expectations for how a math class works – a teacher lectures, there’s lots of drill practice, and then a test. Breaking this mold, and causing them to think of themselves as reflective learners, is one of my many missions. So this past week, when confronted with factoring, I simply refused to lecture.

My 9th graders have seen factoring before, but it was back in 7th grade, and it was only a surface treatment. So after a brief opener where we discussed what a “factor” means (both numerically and algebraically), I dropped the bomb –

  • I’ve posted your learning targets online
  • I’ve posted videos, resources and practice problems if you need them
  • I’ve set up online practice if you need it
  • You have a timed quiz on Friday (we started on Tuesday)

And….scene!

Panic….apprehension….incredulous looks….

So, you’re not going to teach us?

Nope.  Now get to work.

Here are some details of what I posted:

LEARNING TARGETS

  • F1: I can identify and factor expressions which involve greatest common factors.
  • F2: I can efficiently factor trinomials of the form ax2+bx+c, where a = 1.
  • F3: I can factor trinomials of the form ax2+bx+c, where a does not equal 1 (or zero).
  • F4: I can identify and factor perfect square trinomials.
  • F5: I can identify and factor “difference of squares” expressions.
  • F6: I can factor expressions which may represent a combination of F1 to F5.
  • F7: I can factor expressions “by parts” (or “by grouping”) when necessary.
  • F8: I can factor expressions which are the sum (or difference) of two cubes.

RESOURCES

Each learning target featured a video – some from Khan Academy, and some from other sources I searched for – but I attempted to provide a variety of methods. Some featured grouping as a primary means, others demonstrated the box method or the diamond.  This was the most important aspect of this learning experience: I wanted students to experience a variety of approaches, evaluate them, and make a personal decision about what worked best for them.  The students did not disappoint.

I also posted other online resources, such as worked examples and flowcharts.  One of my favorite resources – Finding Factors from nrich, was also included. Finally, I created an assignment on DeltaMath for each learning target, and a final jumbled assignment. The end of each day featured an exit ticket quiz and recap, to assess progress and provide “next steps” during the week.

SO WHAT HAPPENED?

Some students latched onto factoring by grouping for every quadratic, and explained their reasoning to their peers.  Many of these same students later in the week found more confidence in their number sense and chose to group only for “tricky” problems. One student was particularly insistent that the box method was the best was to go for all problems. Others found the diamond method helpful – which led to deep conversations about number sense and how to make searches more efficient. And in one fascinating conversation, a student discovered a “trick” he had found online. The group debated the merits of the method, tried some practice…but as nobody in the group could figure out why the method worked, they quickly dismissed it.  Good boys!!!

In the end, the quiz scores were great.  But beyond the scores, I feel confident that the students have made choices about their learning, assessed and revised their thinking, and can move forward using their new tools.

WHAT DID THE STUDENTS THINK?

Today I asked students to reflect upon their learning experience, and provide me feedback.

What was your overall feeling about last week’s learning method?  (1 = “Please never do that again”, 5 = “I loved it – do it more”.)

chart

Describe something you LIKED about last week’s classes, and why you liked it.

  • I liked being able to choose what i wanted to do. I could focus on my weaknesses and do less problems on what i was good at. I also appreciated the practice problems.
  • I liked that if you knew a topic you could move on and didn’t have to wait for someone else or the next day of class.
  • I liked that I could learn and do problems at my own speed.

Describe something you DIDN’T LIKE about last week’s classes, and why you didn’t like it.

  • I did not like that you did not explain how to factor
  • I didn’t have as much instruction from the master of factoring. {note – I suppose this is me?}
  • the teacher wasn’t involved

This last comment intrigues me…and I’m not sure if I should be bothered by it…I don’t think I should be.  In many respects, I feel I worked harder during the classes, as students were all over the place.  But I also realize students don’t see all of this going on around them.  I’ve become intrigued by how I can be less of a teacher and more of a facilitator in my classes, and this was a solid step forward I feel.

Now, off to plan to not lecture tomorrow….